

How to Use SubEasy: Create AI Subtitles from Video and Export in Multiple Formats
Creating subtitles manually can be time-consuming, especially when working with long videos, interviews, podcasts, online courses, or multilingual content.
SubEasy simplifies the entire subtitle creation workflow. With AI-powered transcription, flexible editing tools, and multiple export options, you can quickly convert your videos into accurate, editable subtitles.
This guide walks you through the complete process:
- Create a subtitle project
- Upload your video or audio file
- Configure transcription settings
- Review and edit generated subtitles
- Export subtitle files or videos
1. Create a New Subtitle Project
Before generating subtitles, start by creating a new subtitle project from your SubEasy workspace.
After logging in, you can access the subtitle creation workflow in two ways:
- Click Subtitles from the workflow section in the center of your workspace.
- Select Subtitles from the left sidebar navigation.
You can also drag and drop your media file directly onto the Subtitles button to start a new project.
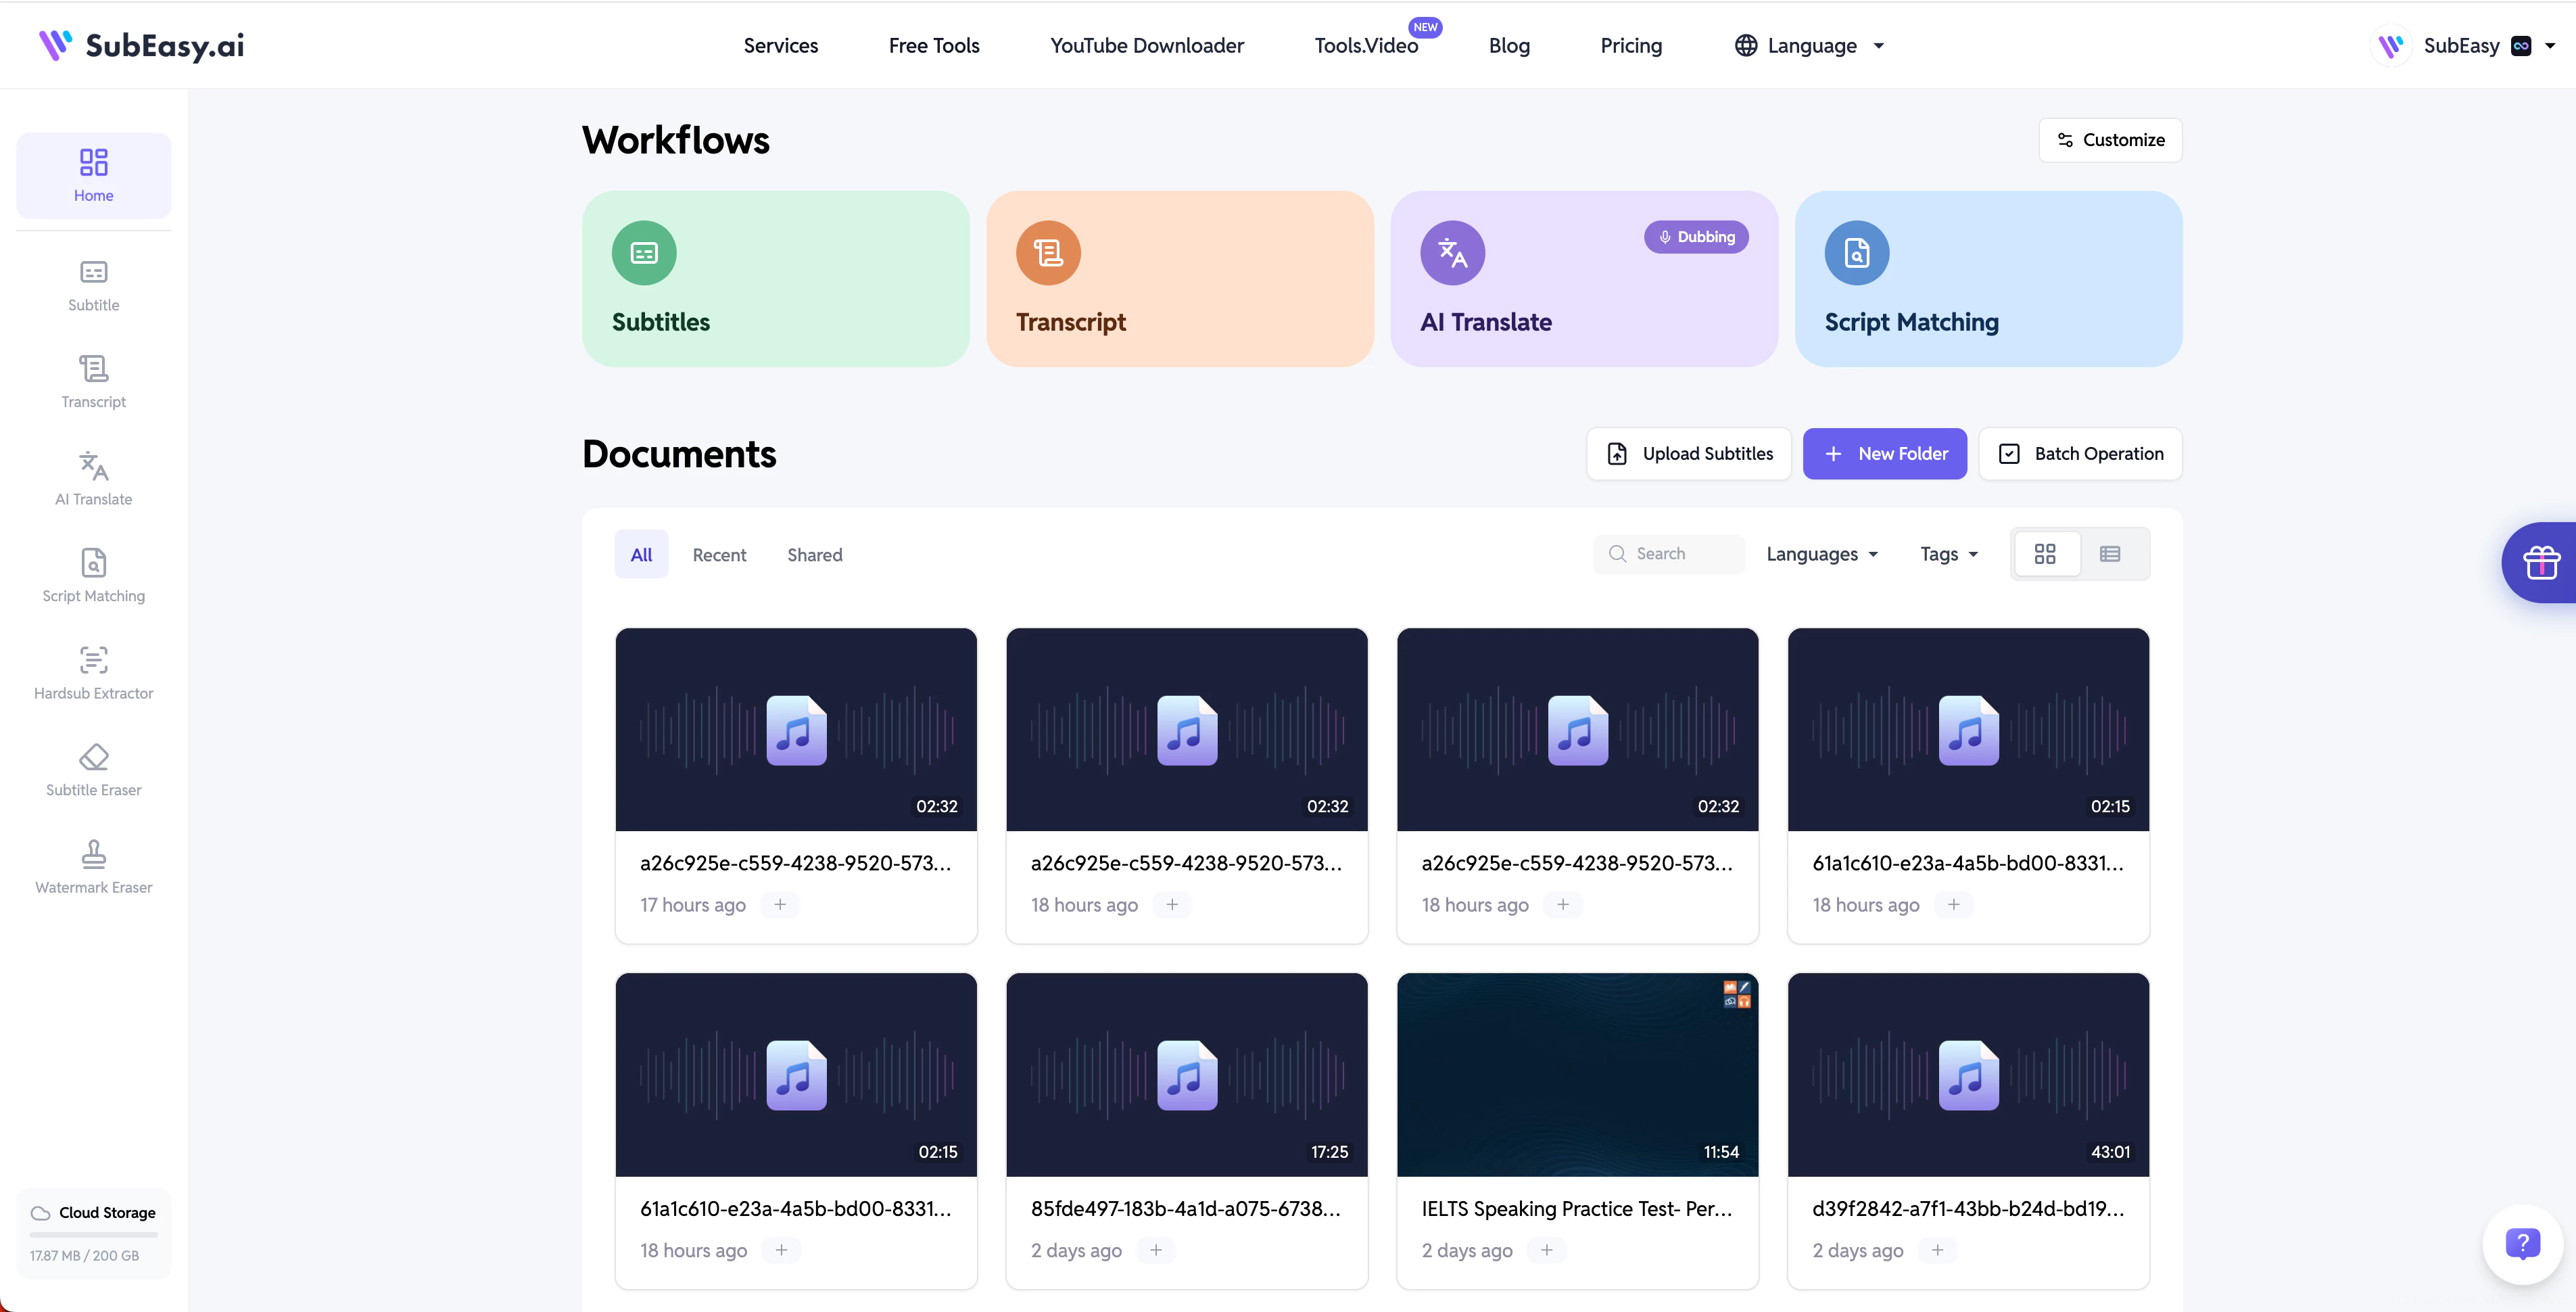
Starting from the workspace allows you to manage your subtitle projects in one place and continue editing or exporting them whenever needed.
2. Upload Your Video or Audio File
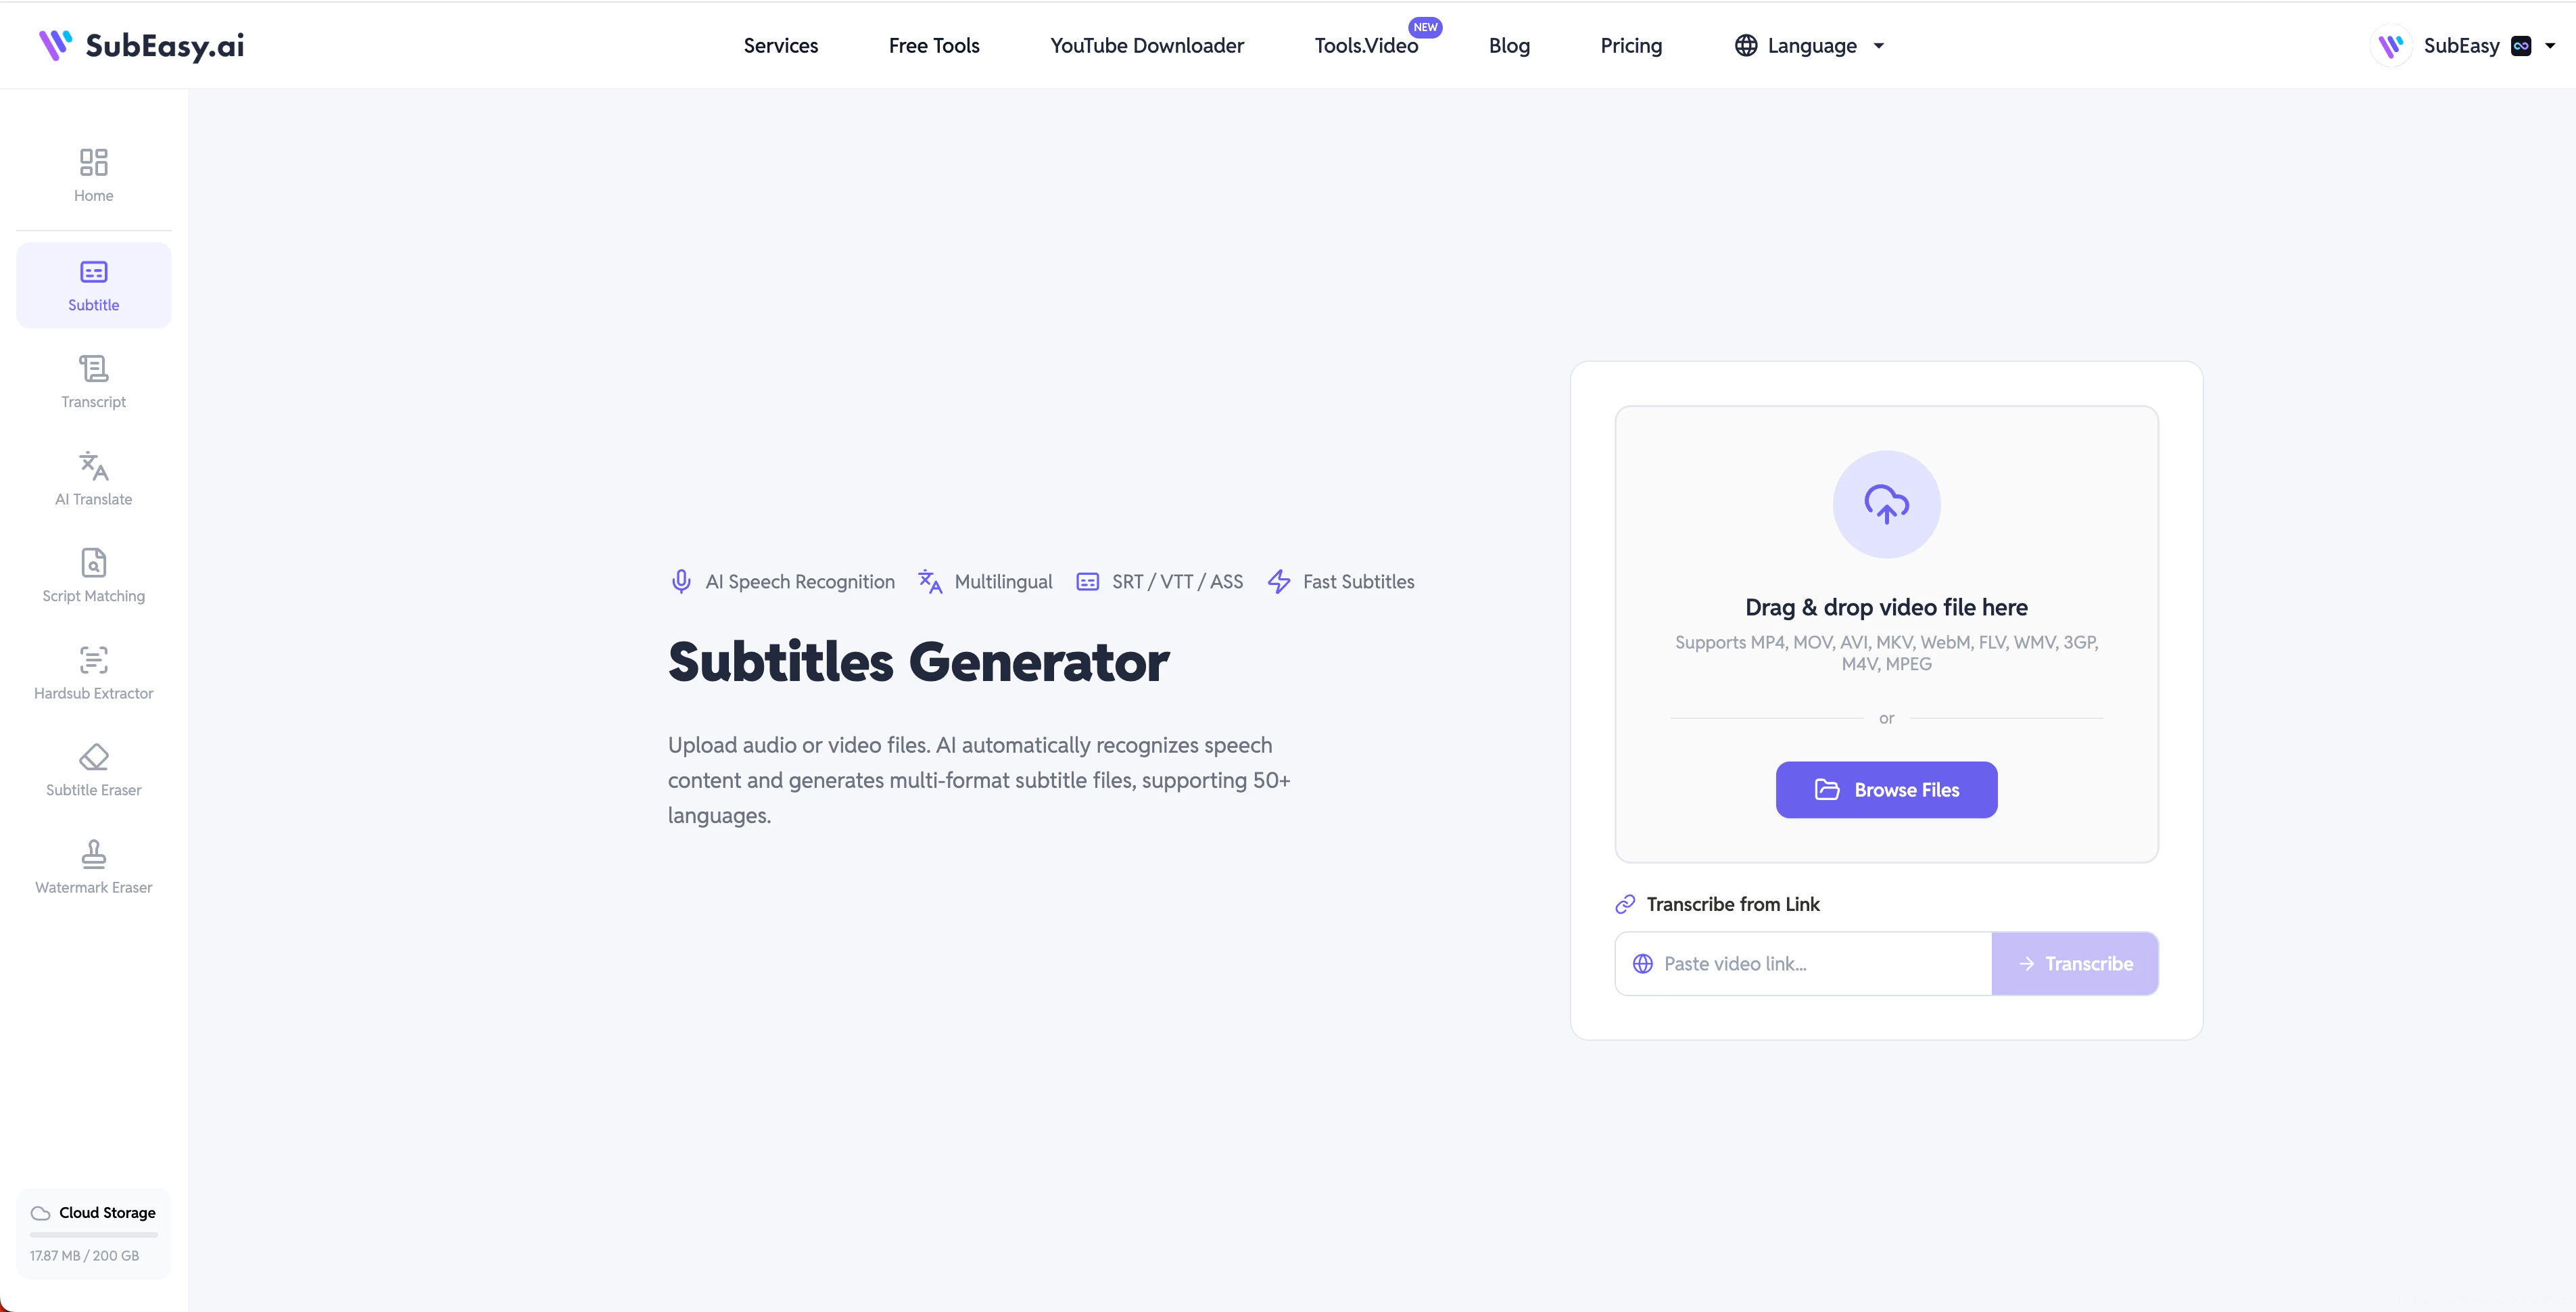
After entering the Subtitle Generator page, upload the media file you want to process.
Click Browse File to select a video or audio file from your device.
SubEasy also supports URL-based transcription. If your video is hosted on platforms such as YouTube, you can paste the video URL directly to start the transcription process.
This makes SubEasy suitable for different content types, including:
- YouTube videos
- Podcasts
- Interviews
- Online courses
- Educational content
- Social media videos
Before starting transcription, make sure your file contains clear speech audio for the best recognition results.
3. Configure Transcription Settings
Before generating subtitles, you can adjust transcription settings according to your video's audio quality and content requirements.
These options help you balance speed, accuracy, and subtitle readability.
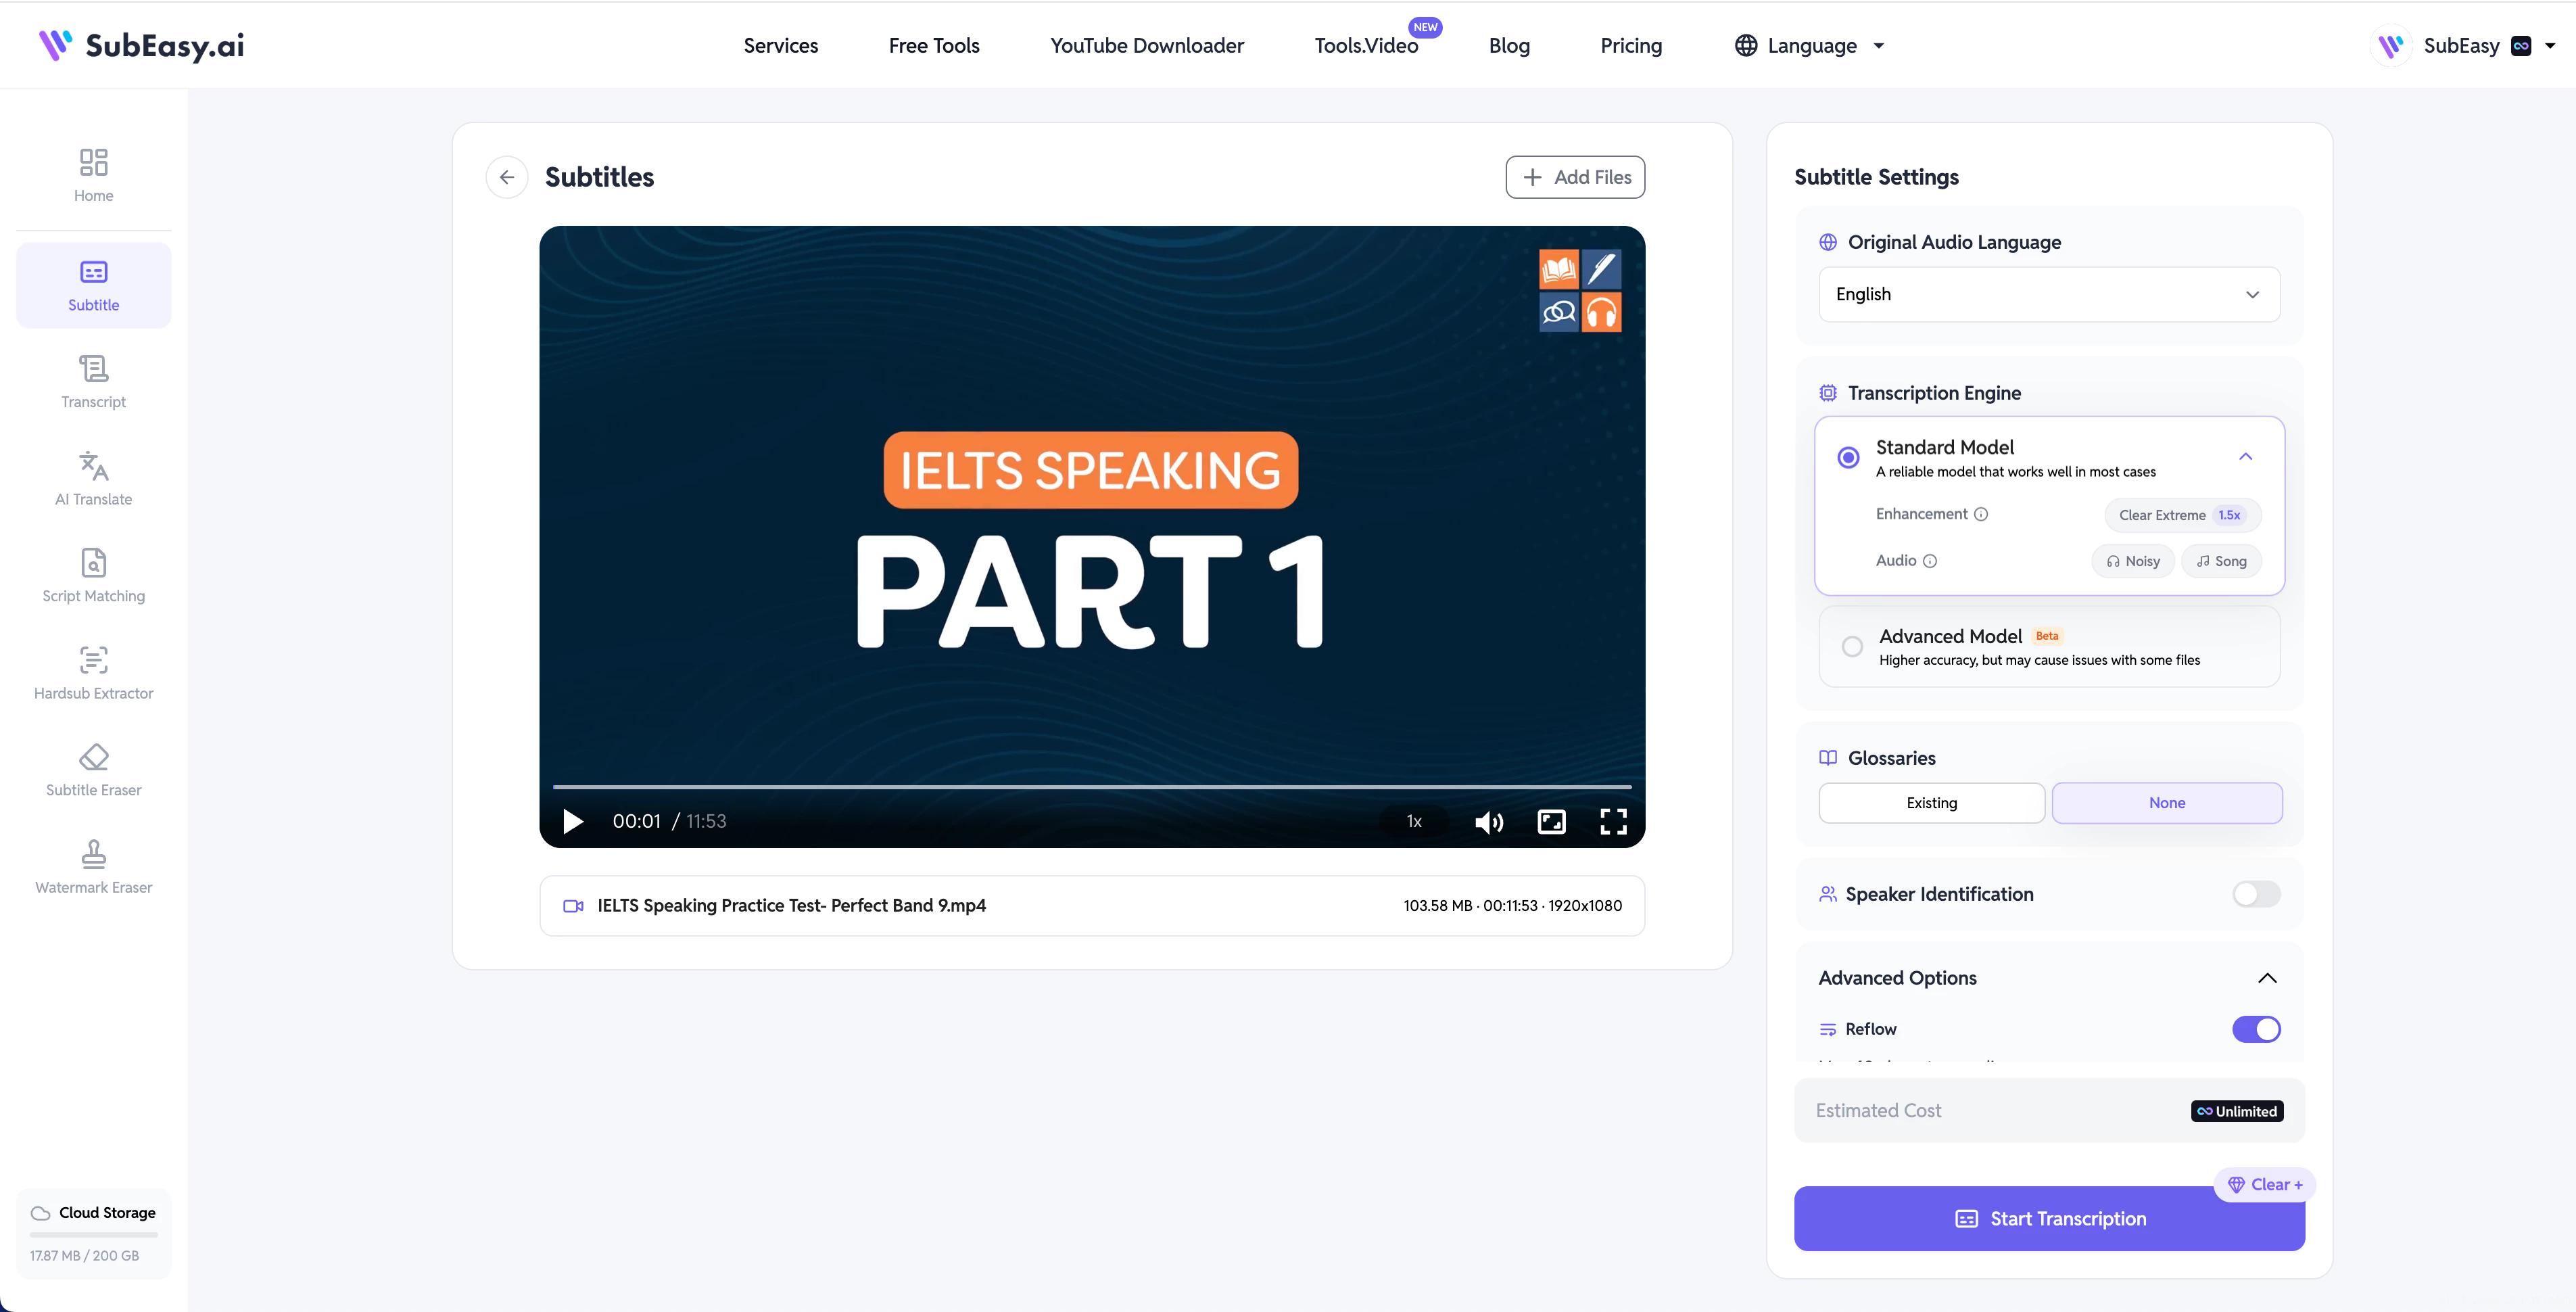
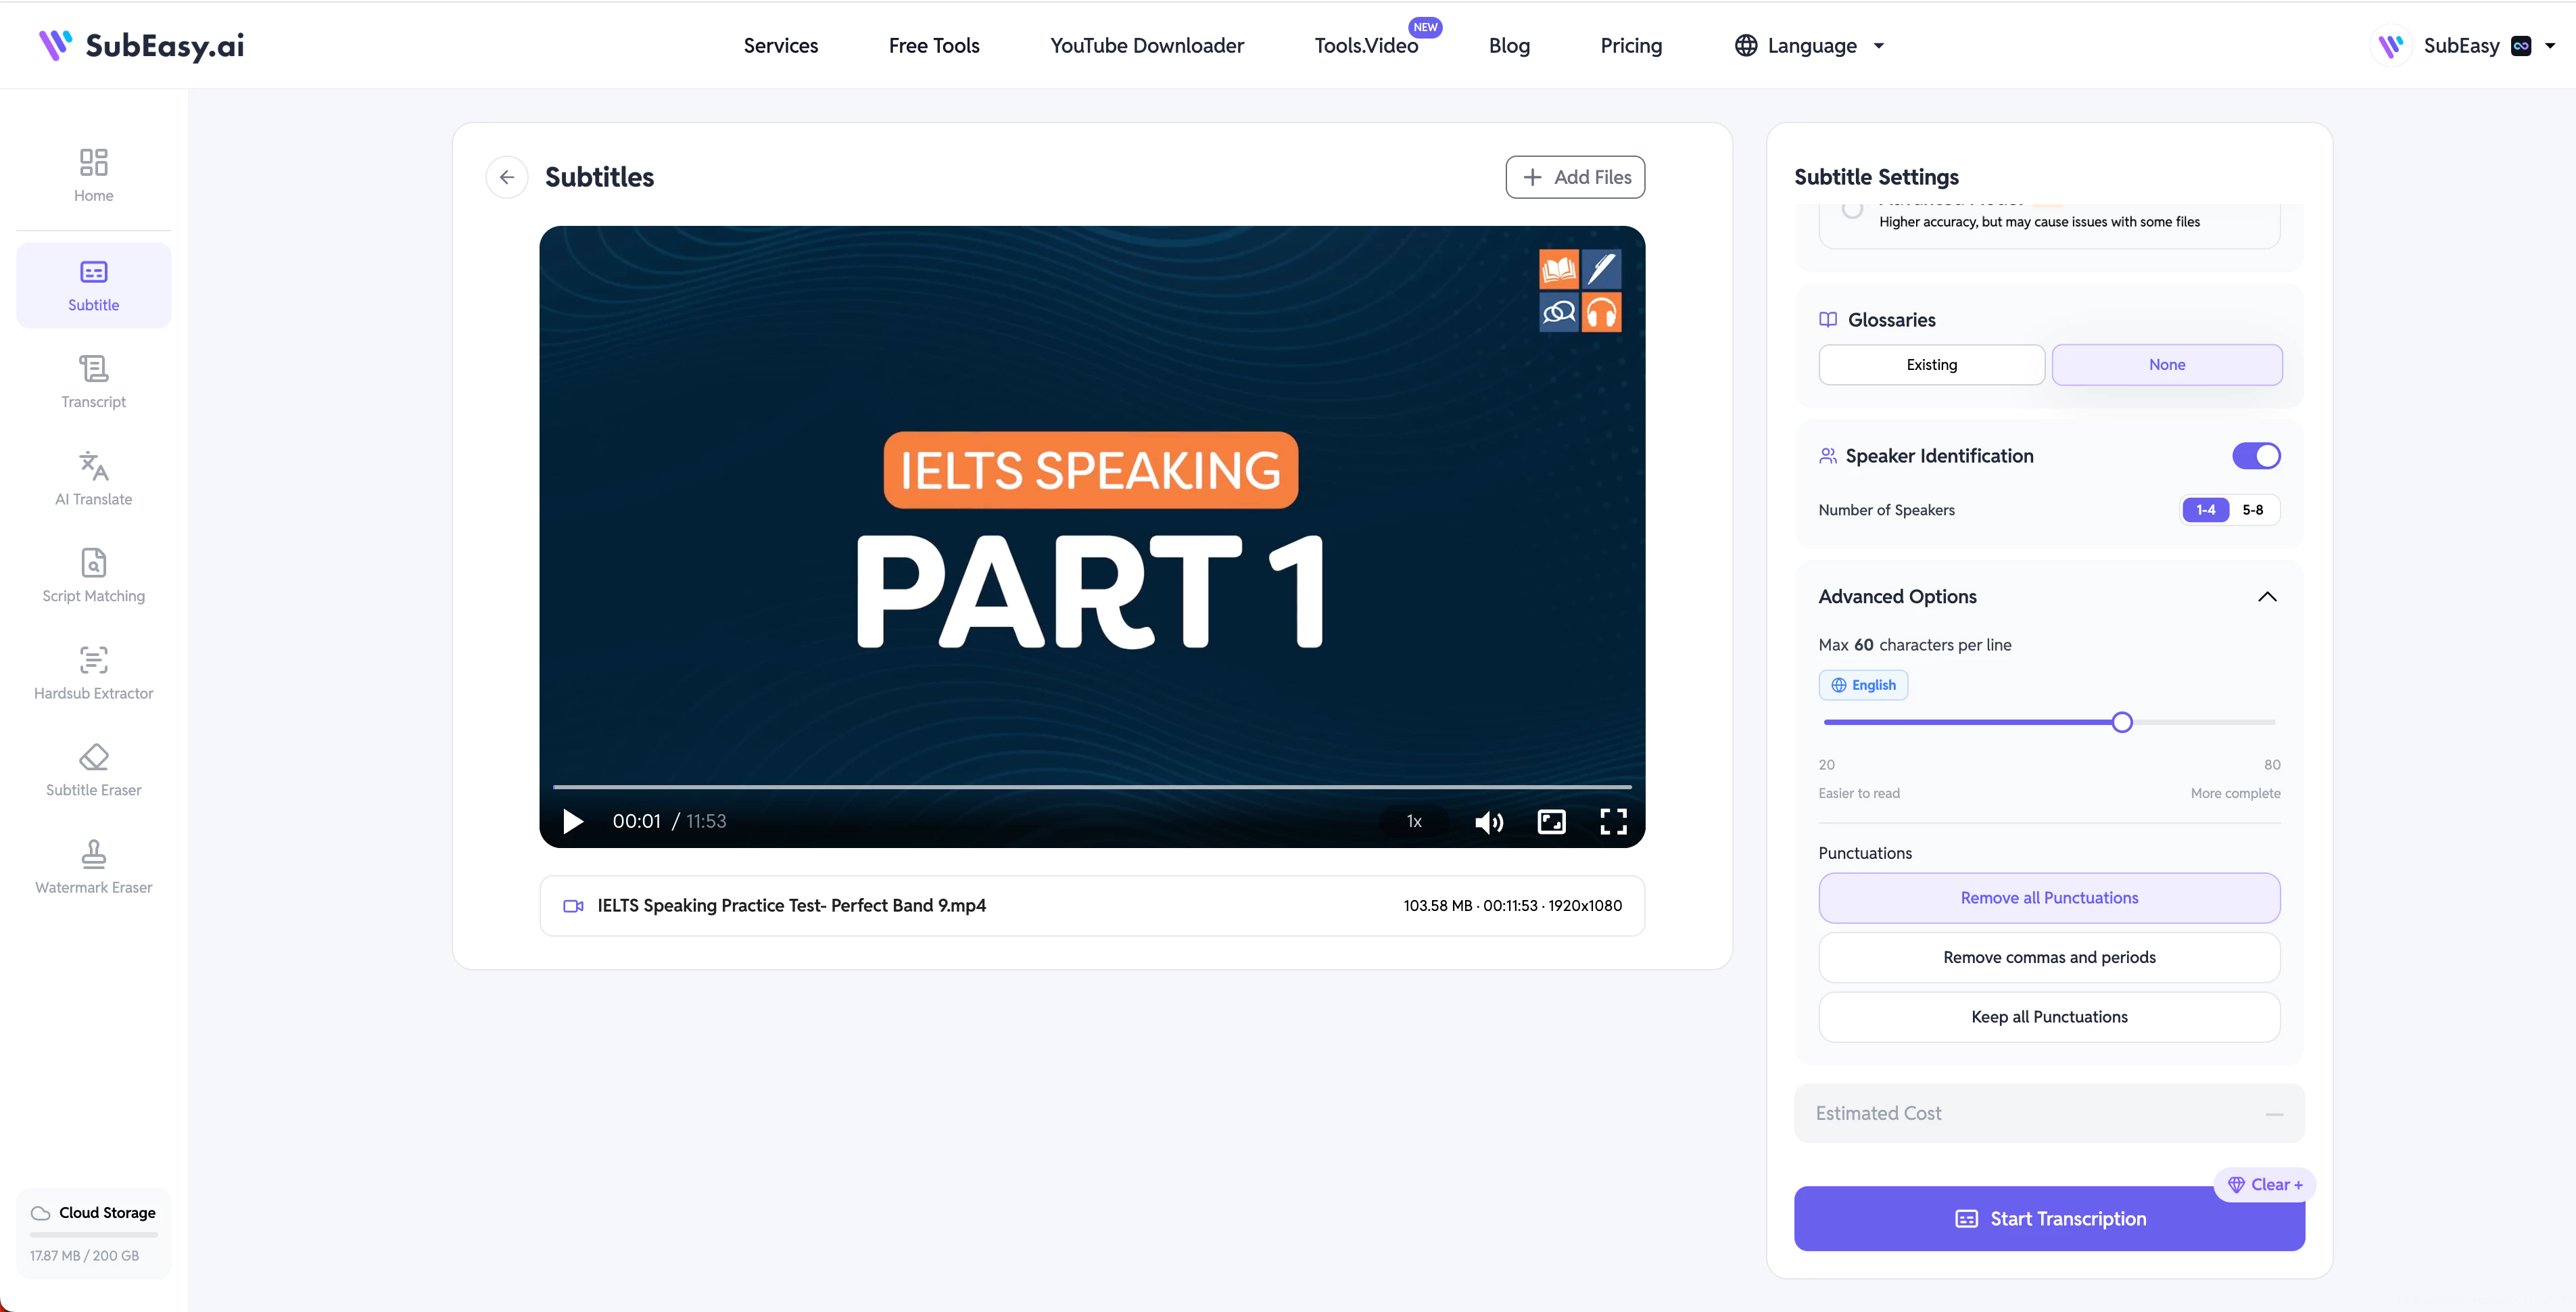
Select Original Audio Language
Choose the language that matches the original spoken language in your video.
Selecting the correct audio language helps SubEasy better understand the speech and generate more accurate transcription results.
For Cantonese content, SubEasy supports both Cantonese Spoken output (e.g., “唔係”) and Cantonese Written output (e.g., “不是”), allowing subtitles to match different audience expectations.
Choose a Transcription Engine
SubEasy provides different transcription options for different scenarios.
Standard Model
For most videos with clear audio, Standard Model provides accurate and efficient transcription.
Recommended for:
- Clear recordings
- Regular videos
- Everyday subtitle generation
For normal usage, Standard Model is the recommended choice.
Clear Extreme
If your video contains background noise, unclear speech, or audio quality issues, you can enable Clear Extreme together with Standard Model.
Clear Extreme helps improve recognition performance in challenging audio environments.
Recommended scenarios:
- Noisy recordings
- Videos recorded in public spaces
- Audio with unclear voices
If you notice missing sentences after using Standard Model, try enabling Clear Extreme and transcribe the file again.
Advanced Model
If your first transcription contains many incorrect words, especially for languages such as Chinese, you can try Advanced Model for improved recognition accuracy.
Advanced Model works independently and cannot be combined with Standard Model or Clear Extreme.
Recommended scenarios:
- Videos containing many specific terms
- Content requiring higher recognition accuracy
- Transcriptions with frequent word errors
Use Glossaries for Specific Terms
If your video contains words that are easily misrecognized because they sound similar to other words, Glossaries can help improve recognition accuracy.
You can add important terms before transcription so SubEasy can better identify and preserve them.
For example, if our video frequently mentions the brand name:
OpenAI
Adding it to Glossaries before transcription helps SubEasy better recognize and maintain the correct spelling throughout your subtitles.
Without Glossaries, AI may occasionally recognize brand names, product names, or technical terms as similar-sounding words.
For example,openai Opanai.
Glossaries are especially useful for:
- Brand names
- Product names
- Technical terms
- Names of people or organizations
Enable Speaker Identification
For videos or audio files with multiple speakers, you can enable Speaker Identification to automatically label different speakers in your transcript.
This feature is especially useful for content such as:
- Podcasts;
- Interviews;
- Meetings;
- Panel discussions.
After transcription, SubEasy can identify and separate different speakers, making it easier to review and edit conversations with multiple participants.
Adjust Subtitle Readability Settings
Max Characters per Line
You can set the maximum number of characters per subtitle line before transcription.
After transcription, SubEasy can automatically rearrange subtitle segments based on your preferred line length, making subtitles easier to read and better suited for different platforms.
Recommended settings:
- English subtitles: around 60 characters per line
- Chinese subtitles: around 30 characters per line
Punctuation Settings
You can choose whether punctuation marks are kept or removed according to your preference.
This allows you to customize subtitle formatting based on your content style and viewing experience.
4. Review and Edit Your Generated Subtitles
After transcription is complete, SubEasy automatically generates editable subtitles synchronized with your video.
The subtitle editor allows you to review the transcription results, modify subtitle content, adjust timing, and customize the appearance before exporting.
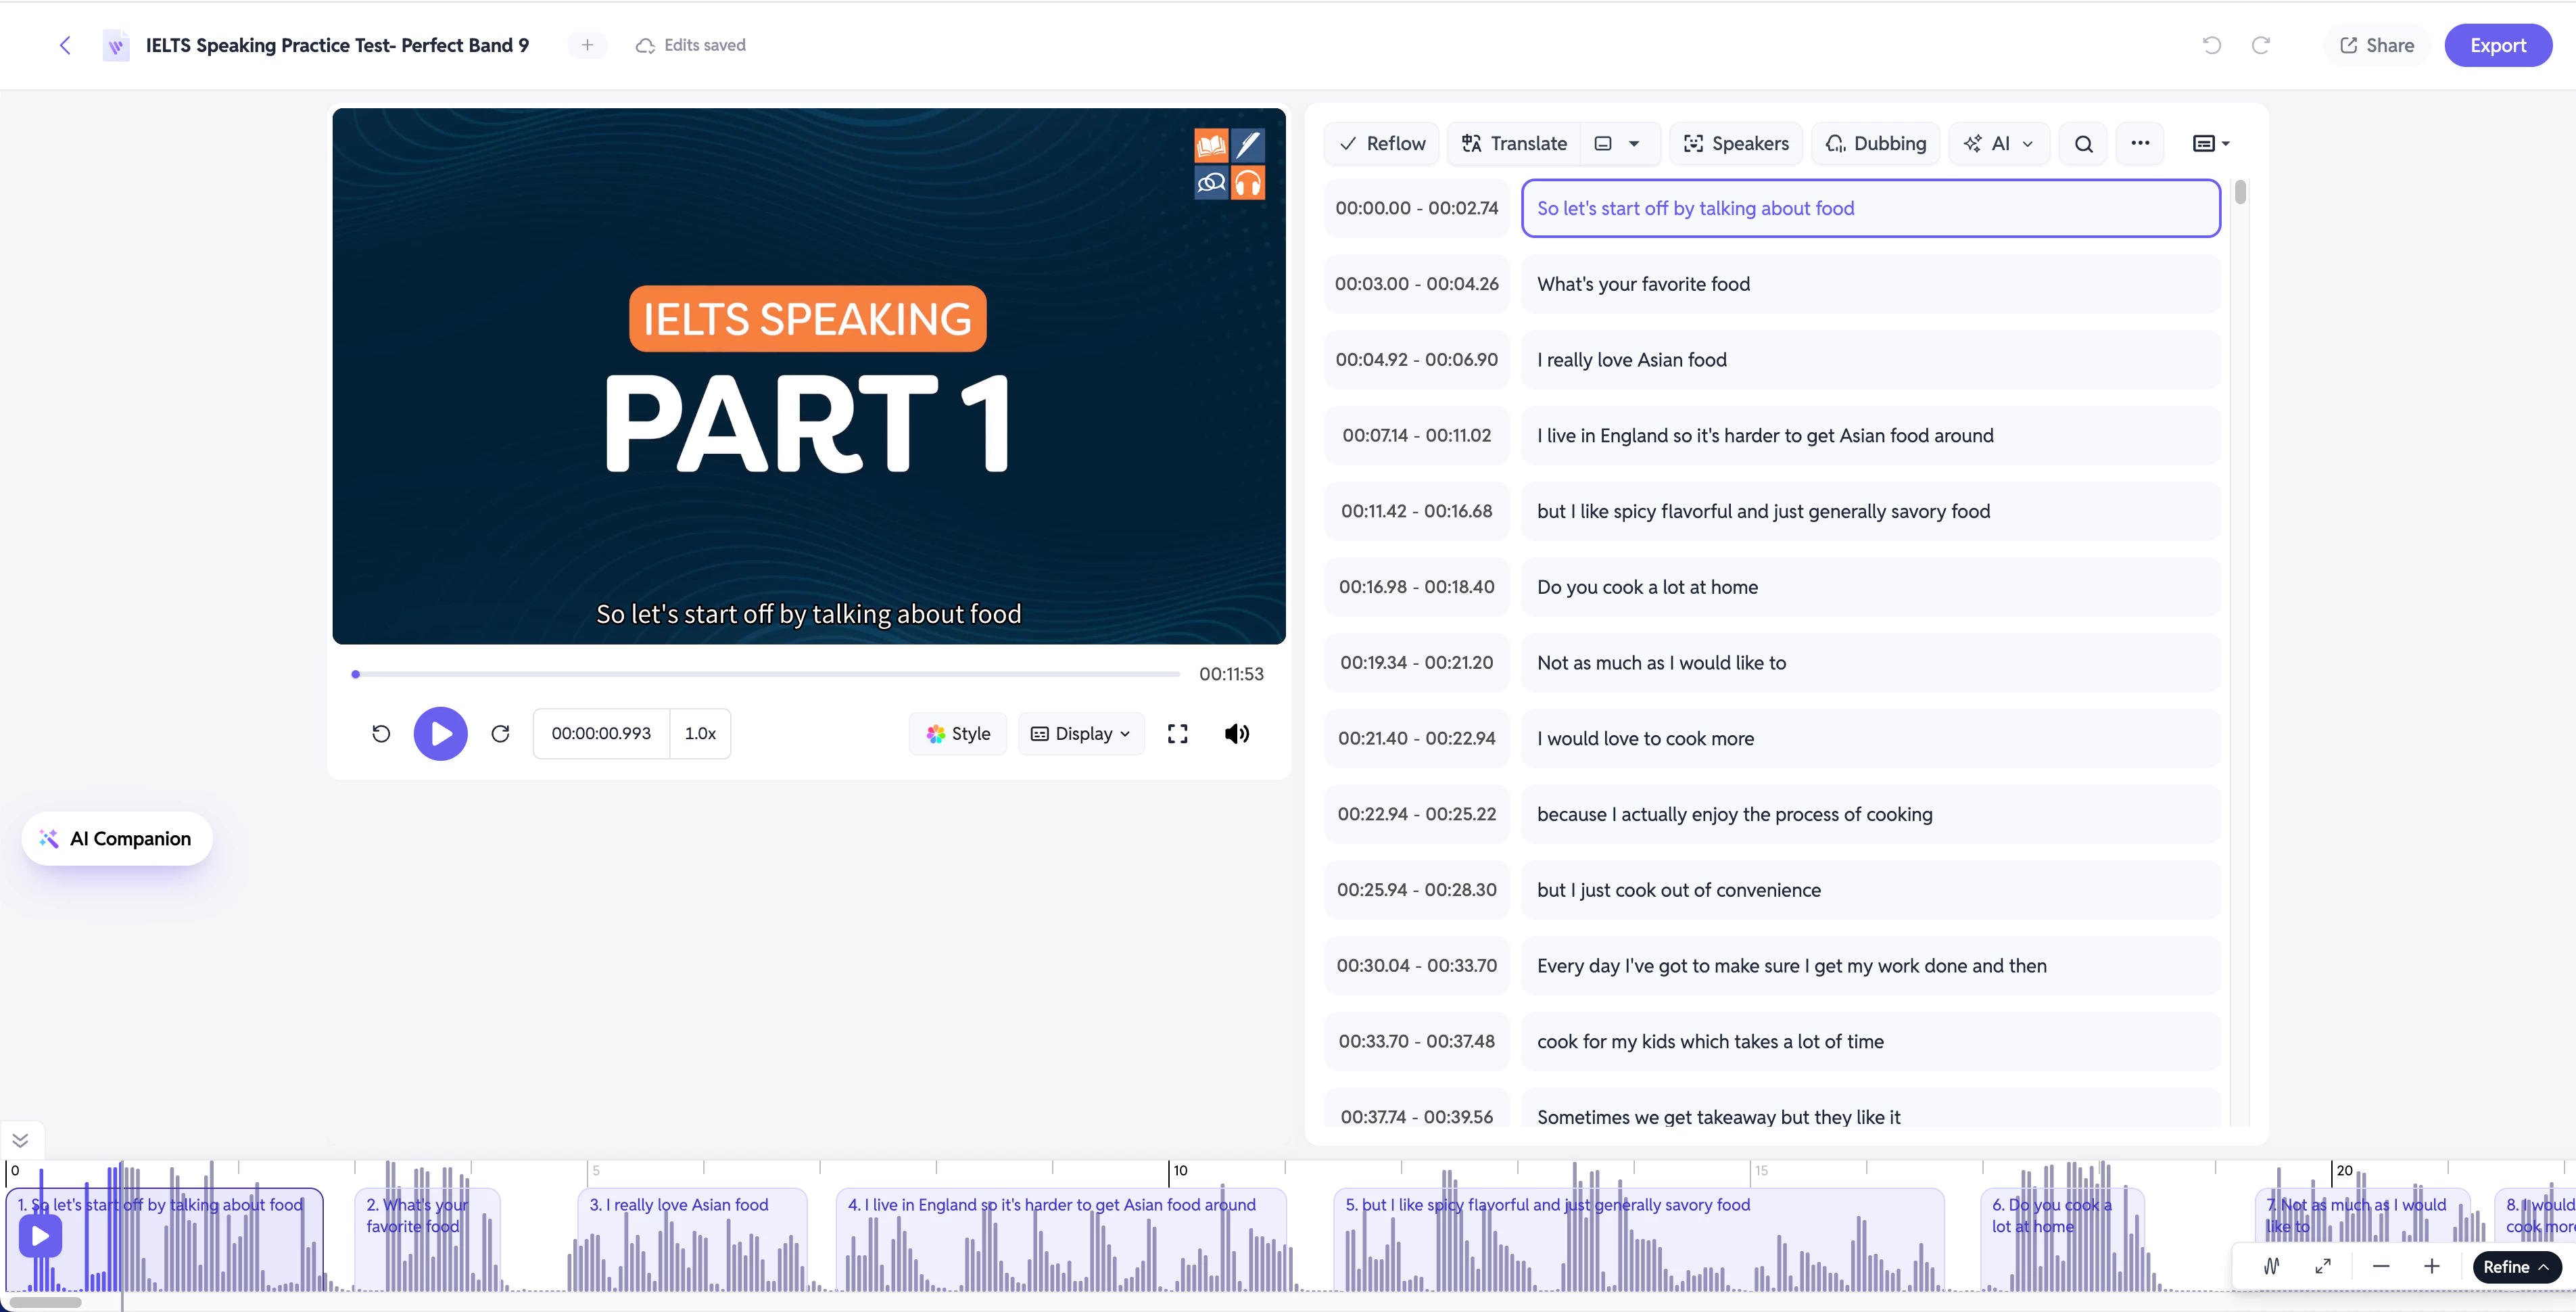
SubEasy provides an all-in-one editing workspace where you can refine your subtitles while previewing your video.
Edit Subtitle Text
The generated subtitles can be edited directly in the subtitle editing panel.
If you find incorrect words, missing information, or expressions that need adjustment, simply click the subtitle text and make changes.
This is useful for:
- Correcting transcription mistakes;
- Adjusting wording for better readability;
- Fixing names, brands, or technical terms.
After editing, the updated subtitle content will remain synchronized with your video timeline.
Adjust Subtitle Timing
Accurate timing is essential for creating natural subtitles.
SubEasy provides two ways to fine-tune subtitle timing.
Edit Timing in the Subtitle Panel
You can directly modify the timestamps of each subtitle segment in the editing panel.
Adjust the start and end time of subtitles to better match the speaker's voice.
Adjust Timing Using the Waveform Timeline
For more precise synchronization, you can adjust subtitle timing directly from the waveform area at the bottom of the editor.
By dragging subtitle segments along the waveform timeline, you can quickly align subtitles with the corresponding audio.
This is especially helpful when:
- A speaker pauses naturally between sentences;
- Generated timing needs minor adjustments;
- You want subtitles to appear exactly when words are spoken.
5. Customize Subtitle Appearance
After reviewing subtitle content and timing, you can customize how your subtitles appear in the video.
Open the Style menu to adjust subtitle appearance according to your content style.
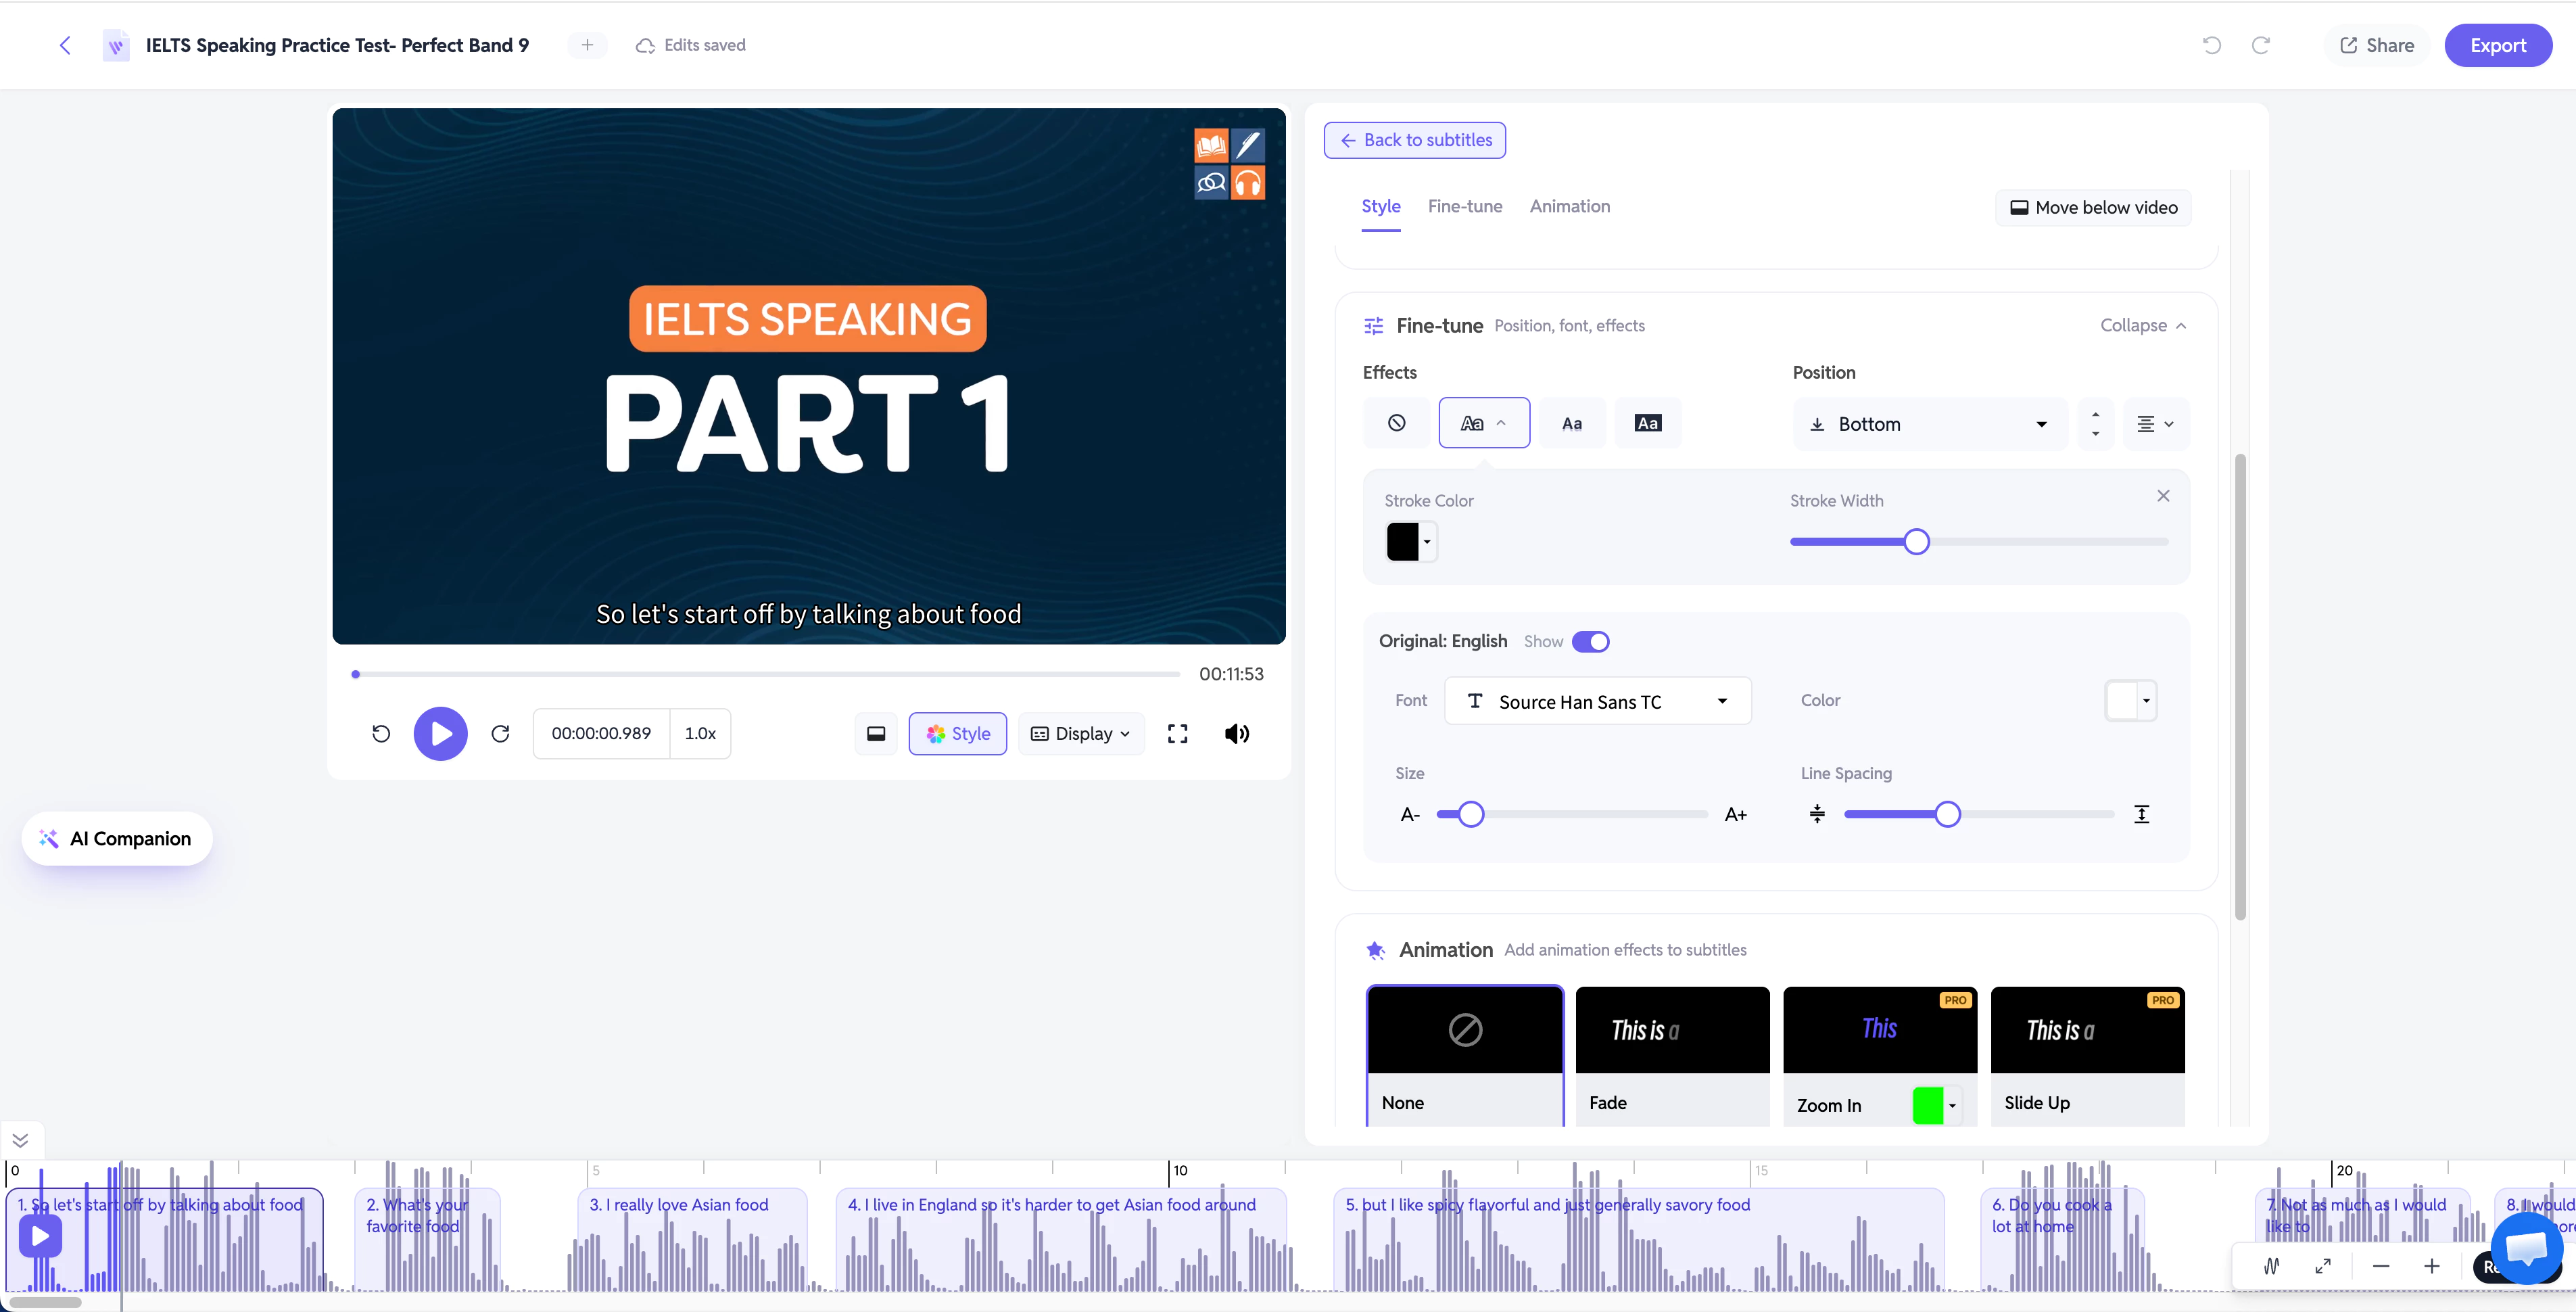
Subtitle styling helps you create videos that are easier to watch and better match your visual branding.
You can customize your subtitle presentation before exporting the final video.
6. Export Your Subtitles or Videos
Once your subtitles are ready, click Export to choose how you want to use your subtitles.
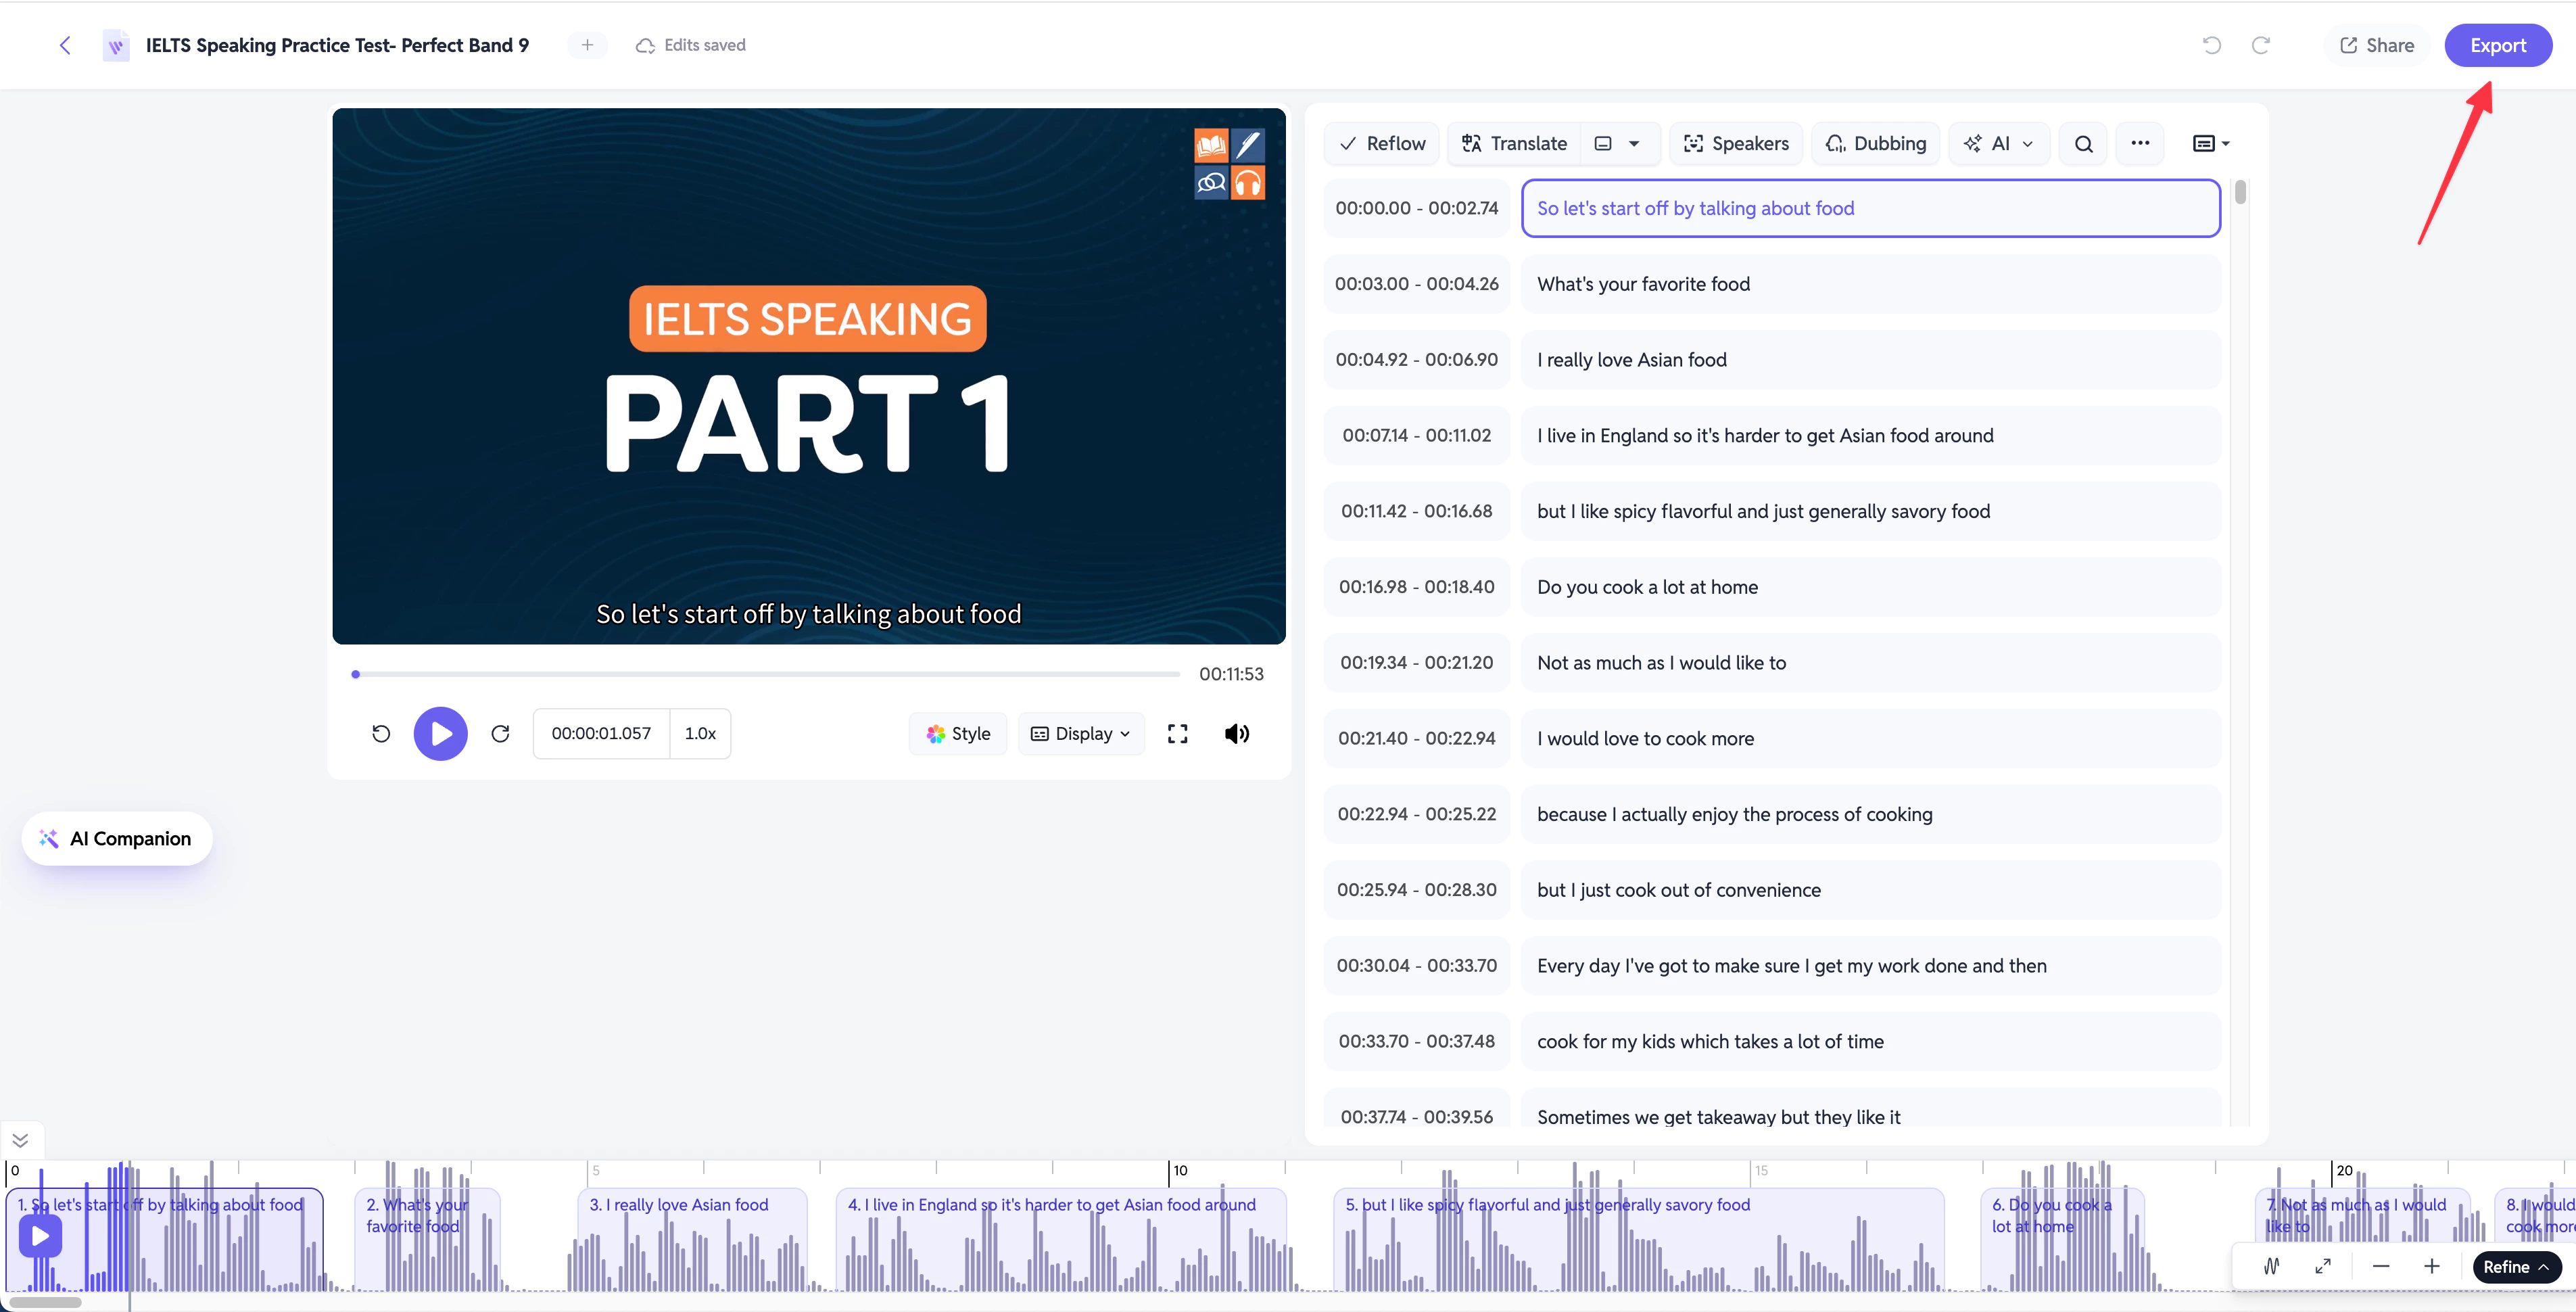
SubEasy provides two main export options:
Export Subtitle Files
Choose Subtitles if you want to download subtitle files and continue editing them in your preferred video editing software.
SubEasy supports multiple subtitle formats, including:
- SRT
- VTT
- ASS
- TXT
- DOCX
- LRC
- CSV
Subtitle exports are useful for creators who want additional editing control in professional video editing tools, such as:
- Adobe Premiere Pro
- DaVinci Resolve
- Final Cut Pro
You can import the exported subtitle files into these applications and continue your video production workflow.
Export Videos with Subtitles
Choose Video if you want to create a finished video with subtitles already included.
You can select your preferred video parameters and export the final subtitled video directly from SubEasy.
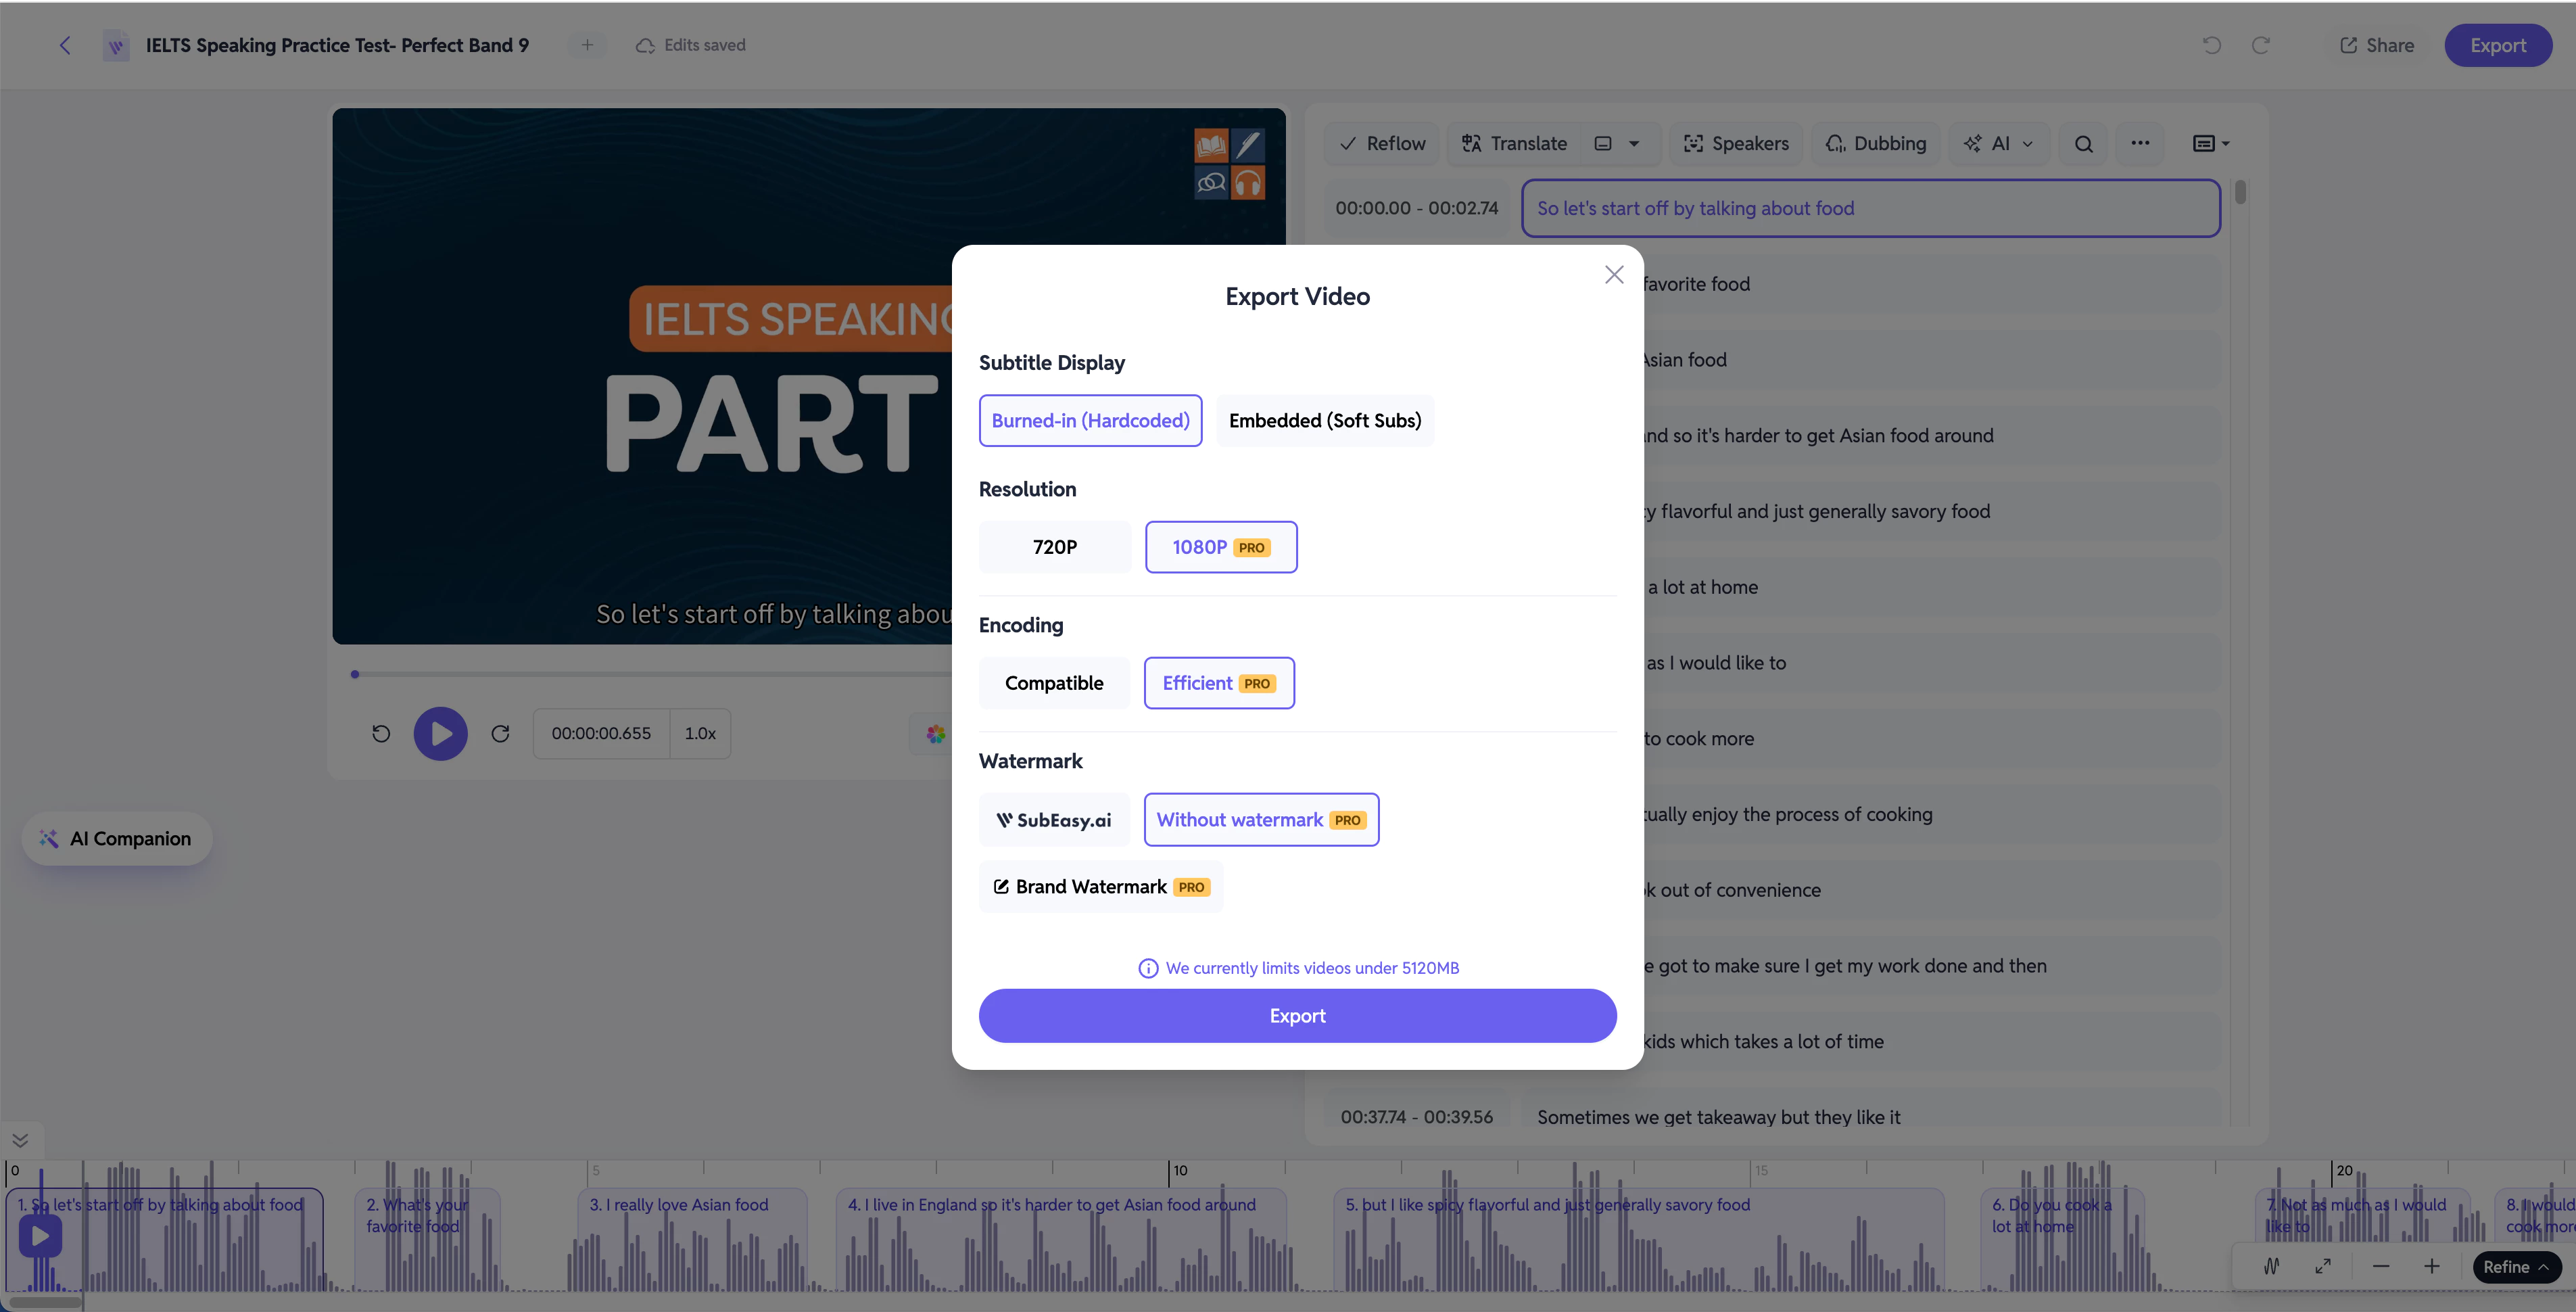
Before exporting, configure the available video settings according to your publishing requirements.
Click Export to generate your final video.
Conclusion: Create Your First AI Subtitle with SubEasy
From uploading your media file to exporting the final subtitles or video, SubEasy provides a complete workflow for creating professional subtitles with AI.
Whether you are creating:
- YouTube videos;
- Podcasts;
- Online courses;
- Interviews;
- Social media content;
SubEasy helps you transform speech into accurate, editable subtitles in just a few steps.
Start your first subtitle project with SubEasy today and simplify your video editing workflow.